Newly added to the kit is the Red Komodo 6k and the Canon C70 4k. I decided to let go of the Canon c300 mark II in favor of these two cameras which will complement each other for different tasks. I’ll be using the Komodo for A cam in interviews and C70 for B cam where I’ll be able to maintain multi channel XLR audio for the boom or lav audio. The C70 will be great for handheld and tracking shots with built in image stabilization and ND filters and excellent face recognition for lock on auto focus. Meanwhile, it still provides a very good codec for post processing and color grading. Both cameras offer some slow motion, but the C70 gets great 120p in 4k while the Komodo is somewhat limited in super slow-mo. The Komodo will of course give me expanded color accuracy and grading possibility with Red raw and will be the choice in the situations that demand it. Color matching between the two for multi-cam is a cinch with removing a couple points of magenta out of the Canon’s highlights.
Quasar Science lights added to the kit
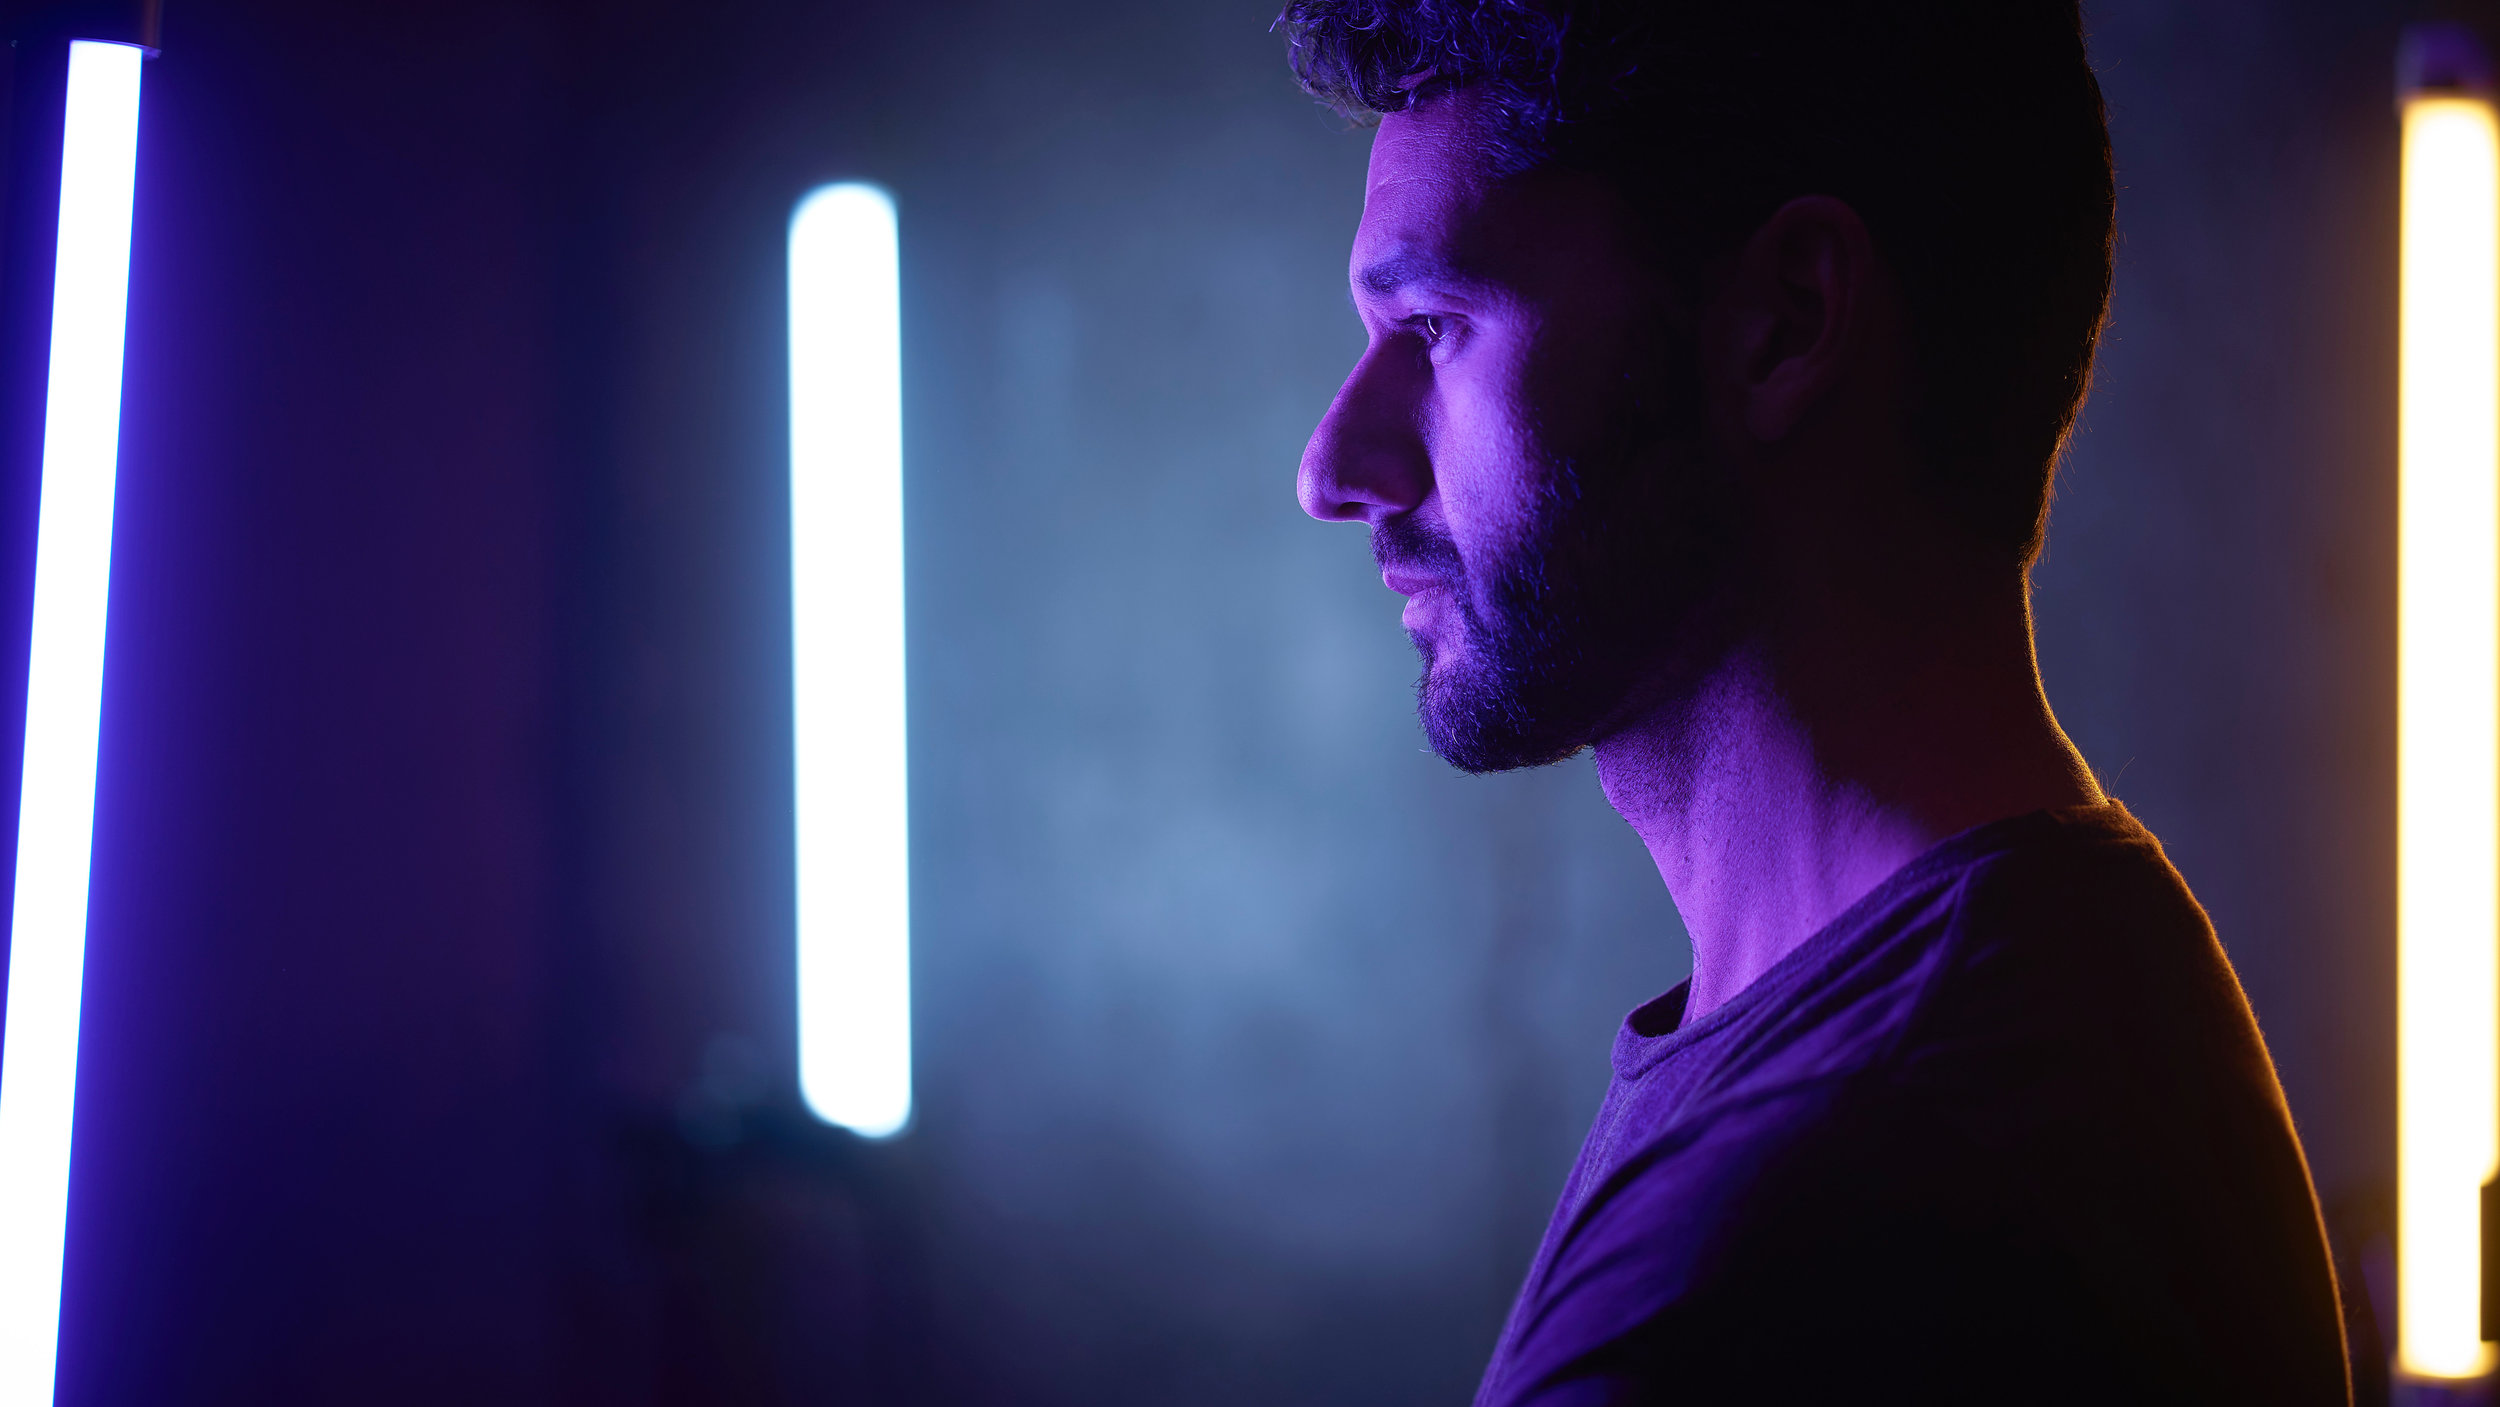
I want to do more to alert clients as to the cool equipment that’s available in my kit so that we can be more collaborative. How will you know the capabilities if I’m not letting you know? So, in that spirit I’ve added 3 amazingly cool lights from Quasar Science to my kit. I now have one 2’ rainbow tube, which is commonly referred to as RGBW, meaning it can mix any color for a desired effect, saturation or color temperature. It can also do some effects for narrative work like cop lights, tv, club or short circuit. I’ve also added two 2’ crossfade tubes which fade from warm to cool. You can see the demonstration in my self portrait below. They can also just be used as normal key and fill lights and are small enough to pack in my travel kit. So, let’s get creative!
See you on set.
A Short and A Feature Film: Process Breakdown, Part 1
In January I had the opportunity to DP an ambitious short film titled "I'm Sorry, I Love You" for director Jaime Gonzalez. The short is not yet released but will be soon and I'll be featuring it here next time when I start to break down the shots.
We were both working on the upcoming feature, "False Hopes", which I DP'd in February so we were able to get some equipment on loan that I had recommended purchasing for that project. In the next few blog posts I'll be walking through some things I learned in the process and breaking down some shots in regards to camera movement, lighting, working with daylight, lighting night interiors, and the biggest one: lighting daylight scenes that continue on into the night.
The short film was a perfect opportunity to test out all the new goodies a week before moving on to the feature. It is critically important to test all equipment including lights, stands and grip pieces to ensure it is functioning out of the box. Do you really want to show up on a shoot and put up your 8x8 silk just to find out the clamp doesn't tighten, letting it spin around in the wind? I arrived in LA a day early from Denver so I could do equipment checks and review angles in the house location we were using. It turned out that I had spent the first day and next morning right before the shoot troubleshooting and calling up tech support for various last minute catastrophes. Like I said, equipment tests are critical.
Recording raw on the Atomos Shogun Flame
We were shooting on the Sony FS700 with raw upgrade via SDI out to the Atomos Shogun Flame which does a very good job of transcoding the raw signal into Quicktime ProRes which provides are very gradeable codec. Highlights are recoverable, details are sharp and colors are rich. The Shogun was super easy to setup to receive the raw signal and it was up and running within minutes.
The monitor is big, bulky and heavy when powered by a couple large Sony L series batteries so it's really important that you have an appropriate rig with proper length arms to support it. What I had intended to do was use the Atomos as the director's monitor on the dumb side of the camera, or elevated on top so the director could stand a couple of feet behind watching action on the bright, 7" monitor with beautiful HDR color grading. I wanted to mount my 5" SmallHD 501 fed by HDMI out from the Atomos which supports loop through so I could get close and pull focus. This turned out not to be possible. I couldn't get a clean signal feeding in to my SmallHD. Whatever I saw was garbled noise. I checked around and couldn't find an answer so I upgraded the firmware on the Shogun as it was handed to me with firmware several generations old, but still no luck. I got an answer via email from Atomos pretty quickly. In case anyone needs to know, if the Shogun is receiving a raw signal you can't loop out a non-raw signal. In any event, the Atomos is large enough for more than one person to view, but not at all times. Sometimes when there is dolly action or handheld work you just can't share the monitor. The Atomos/FS700 combo decision was made by the production company and so I was a bit surprised to find out certain things weren't possible. When it's not your gear you will be presented with surprises, which is why the DP needs to be prepared for any circumstance and keep on researching.
A Warning Regarding Dracast LED Fresnels
I purchased 4 of these for the feature film and was simultaneously disappointed and impressed. I had a very limited equipment budget to use for a 30 day shoot. We'd be in mostly household or small commercial locations and renting wasn't really an option. Not only would I not have the time to go pick and drop off more powerful lights as we needed them but I wouldn't be able to run generators for more powerful and cheaper tungsten heads. We decided on purchasing LED and one 565W HMI from CAME TV which turned out to be a fantastic unit and I wished I had gotten another one.
We bought 2 of the LED 500's and two of the 700's. The price point is great and the light output and color reproduction is fantastic. However, if they don't turn on then what good are they? Dracast support however was good and they answered the phones right away. The build quality is probably the biggest disapointment on these heads. One of the 500's arrived with a shorting control panel, a missing screw and none of the 4 would illuminate. Documentation? None in the box or on the website. Tech support explained I needed to change the mode on the side panel to the A1 option and then dial up the power. Why were they defaulted to DMX mode? Why is there nothing explaining what A1 or A2 is? Mysteries abound.
The next issue you need to know about is that the cords are the lowest quality I've ever seen. First, they annoyingly short. You'll need to go buy an additional extension cord for each unit because they won't even reach the wall once you put it up on a stand. Second, you must very gently remove the plug from the wall. I don't mean grip the housing and base of cord together in a firm grip, I mean only pull the plug housing by pinching with thumb and forefinger as any pressure on the cord itself will pull the cord right out (or at least begin fraying the connection). I had to replace the cord ends with new ones from Home Depot as they would never last on a month long shoot. Two of them broke on the first day and another began shorting two days later. The weak rubber cord is not crimped or reinforced by the plug housing and at the other end I saw the outer rubber coating begin to split at the housing of the head itself which is even worse. It's easy to replace a plug, but not easy to open the unit and access the power supply.
Final advice: I really wanted to like these lights. Even though the light output and quality is wonderful I would still suggest to move on to another, more expensive brand if you can afford it. The cuts in build quality are just not worth the savings if you're left stranded. I should also add that we bought two of their light panels and 4 smaller battery powered blender panels and they worked perfectly with no issues. There are lots of options for LED panels out there, but not many affordable ones for fresnels which is the dilemma when working with limited budgets.
"Rivers, Paths and Bridges" an exploration of Bear Creek Park
After moving to Denver, CO from CT this year I was fortunate enough to have Bear Creek Park just down the street from my house in Lakewood. This is a little compilation of shots I did at the park over several weeks using my DJI Phantom 4 drone and some locked off shots with Sony a7SII.
Coming from the east coast I did not grow up with accessible parks and outdoors experiences so this is me paying respect to my new home and all the inspiration it gives me.
Sony a7SII with Sony 16-35f4 and Zeiss Loxia 50/2
DJI Phantom 4
Color graded with FilmConvert in FCP X
Travel light with big results
Like any filmmaker or photographer I want to bring the kitchen sink with me when I go to a job because I want all the flexibility possible. What if we want to do a walking shot, do I need a stabilizer? What if we shoot an interview outside? It's possible to paralyze myself by thinking about all the infinite possibilities, especially when traveling. When traveling we have case size and weight limitations, not to mention I can only handle so much when walking through the airport.
Planning, preparation and practice is key. At a certain point you have to call it. You need to just say, "enough is enough" and take what you can fit in your bag and just leave the office knowing that you've practiced with the equipment you have and know how to get the best results with what you have. However, I've made some conscious decisions in the past year to make my kit as travel friendly as possible while still giving me maximum flexibility and output.
First, I tackled my camera system and ditched the heavy and bulky Canon DSLRs for lightweight and thin Sony a7r mark II and a7s mark II. I still have my Canon c100 for when I need it. Additionally I got rid of my heavy f2.8 zoom lenses in favor of the lighter and smaller f4 versions. Yes, I am losing a stop of light but the incredibly clean high ISO performance of the camera bodies easily compensates for that. I can even power the Sony cameras through cheap and readily available USB cell phone chargers so I don't have to worry about the smaller battery capacity. Using the a7s II with internal stabilizer, coupled with Sony's outstanding stabilized lenses and continual auto focus I am able to attach a couple lightweight aluminum handles to my Varavon Zeus cage and with some practice I can deliver very stabilized shots which eliminates the need for a gimbal or steadicam in many situations.
Next I reevaluated my support system and rid myself of the heavy aluminum tripods and sliders and got a Really Right Stuff carbon fiber tripod and Rhino carbon fiber slider. The weight savings here is significant and means I can take my slider with me more often thereby allowing me a higher quality production value on those smaller shoots when I normally wouldn't have brought it with me.
Equally as important as camera or support was my lighting approach as sometimes you just don't have a good source of light on location. Years ago when I switched from tungsten hot lights to LED it was a big step and made shooting on battery power in remote locations a real possibility for filmmakers like me. But now I'm unloading my lightpanels for the next wave which is Westcott's amazing flex panels which way mere ounces and are a 1/4" thick. This lets me pack my lights in my camera case and bring my full studio production on the airplane and in to my client's office.
No, none of this stuff is cheap. In fact it's all very expensive, but that doesn't mean you have to buy it all at once. I am a believer in buying quality items over time to make it more affordable and obtainable and selling the things you don't use. High quality products will make your work better and in the end make you more successful as you continually bring up your production value and deliver better results to your clients.
I don't want to leave people with the impression that it's all about the equipment, because it's not. A great photographer or filmmaker will make something great no matter what they're given because they have the talent to make use of the tools. So the first thing that you need to do is just shoot and edit with a careful eye to study your mistakes. Then study the technology to perfect your craft to make the best of what you have. Then, when you do add something nice to your kit you'll excel even more.